Express简介
一、简介
Express是一个简洁灵活的NodeJs Web应用程序框架,为Web和移到应用程序提供了一组强大的功能。
二、安装
-
安装NodeJs
-
初始化
使用npm init命令创建package.json文件:
npm init
可以将主文件修改为:app.js,默认为 index.js:

- 安装express
npm install express --save
上面的命令会安装Express并将它写入到package.json的dependencies列表中:
{
  "name": "myapp",
  "version": "1.0.0",
  "description": "",
  "main": "app.js",
  "scripts": {
    "test": "echo \"Error: no test specified\" && exit 1"
  },
  "author": "",
  "license": "ISC",
  "dependencies": {
    "express": "^4.14.0"
  }
}
- 创建并运行app
在myapp目录下创建app.js:
const express = require('express');
const app = express();
const port = 3000;
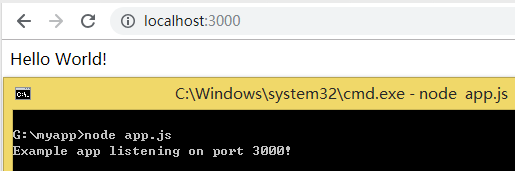
app.get('/', (req, res) => res.send('Hello World!'));
app.listen(port, () => {
console.log(`Example app listening on port ${port}!`);
});
执行:node app.js 或 node app,在浏览器中访问:http://localhost:3000/, 即可看到:Hello World!
三、路由
1、简介
路由是指应用程序如何响应客户端HTTP请求(GET、POST等)。
app.METHOD(PATH, HANDLER)
其中:
-
app是express的实例
-
METHOD是HTTP请求方法,小写
-
PATH是请求路径
-
HANDLER是路由匹配时的处理函数
2、路由路径
- 响应根路由(
/)上的POST请求
app.post('/', function (req, res) {
	res.send('Hello World!');
});
- 响应
/user路由上的DELETE请求
app.delete('/user', function (req, res) {
	res.send('Got a DELETE request at /user');
});
- 响应对根路径下
readme.txt的GET请求
app.get('/readme.txt', function(req, res, next){
	res.send('This is readme.txt file.');
});
-
字符串模式的路由路径
字符
?、+、*和()是正则表达式的子集,-和.在基于字符串的路径中按照字面值解释。- 访问
/acd或/abcd
app.get('/ab?cd', function(req, res, next){ res.send('ab?cd'); });- 访问
/a-z
app.get('/a-z', function(req, res, next){ res.send('a-z'); }); - 访问
-
正则表达式的路由路径
- 访问
/a
app.get('/a/', function(req, res, next){ res.send('/a/'); });- 访问任意字符开头且以fly结尾的地址
app.get('/\\w*fly$/', function(req, res, next){ res.send('/\\w*fly$/'); }); - 访问
3、路由句柄
路由句柄(HANDLER)有多种形式,可以是一个函数、一个函数数组,或者是两者混合。可以为请求处理提供多个回调函数,其行为类似中间件,唯一的区别是这些回调函数有可能调用 next(‘route’) 方法而略过其他路由回调函数。也可以利用该机制为路由定义前提条件,如果在现有路径上继续执行没有意义,则可将控制权交给剩下的路径。
- 使用一个回调函数处理路由
app.get('/example/a', function(req, res){
	res.send('Hello form A!');
});
- 使用多个回调函数处理路由
app.get('/example/b', function(req, res, next){
	console.log('response will be sent by the next function...');
	next();//next
}, function(req, res, next){
	res.send('Hello from B!');
});
- 使用回调函数数组处理路由
var fun1 = function(req, res, next){
	console.log("Function 1");
	next();
};
var fun2 = function(req, res, next){
	console.log('Function 2');
	next();
};
var fun3 = function(req, res, next){
	res.send('Hello from arr!');
};
app.get('/example/arr', [fun1, fun2, fun3]);
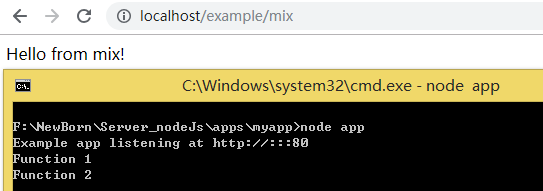
- 混合使用函数和函数数组处理路由
var fun1 = function(req, res, next){
	console.log("Function 1");
	next();
};
var fun2 = function(req, res, next){
	console.log('Function 2');
	next();
};
app.get('/example/mix', [fun1, fun2], function(req, res, next){
	res.send('Hello from mix!');
});
四、中间件
1、简介
可以在指定的路径上挂载指定的中间件函数,当请求此路径时就会执行中间件函数。语法如下:
app.use([path,] callback [, callback...])
2、示例
- 指定的路径也会匹配其子路径
例如:app.use('/apple')会匹配/apple、/apple/images、/apple/images/news等。
- 对每个请求都执行指定的中间件
没有挂载路径(path默认为/)的中间件,应用的每个请求都会执行该中间件:
app.use(function (req, res, next) {
	console.log('Time: %d', Date.now());
	next();
});
- 中间件函数是顺序执行的
在下面的例子中,访问/总是会显示Hello World而不是Welcome。
app.use(function(req, res, next) {
	res.send('Hello World');
});

app.get('/', function (req, res) {
	res.send('Welcome');
});
- 挂载至/user/:id的中间件
处理类似/user/xxx的请求:
//参数名为id
app.use('/user/:id', function(req, res, next){
	console.log('Request Type: ', req.method);
	next();
});

//处理指向/user/:id的GET请求
app.get('/user/:id', function(req, res, next){
	res.send('USER...');
});
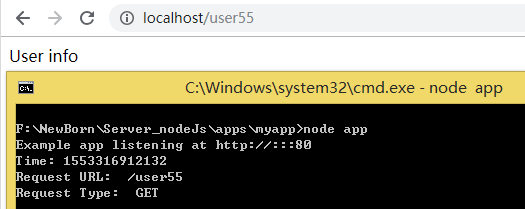
- 挂载一组中间件
处理类似/user55的请求:
app.use('/user\\d+', function(req, res, next){
	console.log('Request URL: ', req.originalUrl);
	next();
}, function(req, res, next){
	console.log('Request Type: ', req.method);
	next();
}, function(req, res, next){
	res.send('User info');
});
- 跳过剩余中间件
如果需要在中间件栈中跳过剩余中间件,调用 next(‘route’) 方法将控制权交给下一个路由。
注意:此方法只对使用app.METHOD()或router.METHOD()加载的中间件有效。
app.get('/addUser/:name([a-zA-Z]+)', function(req, res, next){
	var username = req.params.name;
	if(username === 'wzk'){
		//调到下一个路由
		next('route');
	}else{
		//渲染常规页面
		res.send('Customer: ' + username);
	}
});
app.get('/addUser/:name([a-zA-Z]+)', function(req, res, next){
	res.send('VIP: ' + req.params.name);
});
访问/addUser/albert显示:
Customer: albert
访问/addUser/wzk显示:
VIP: wzk
- 处理错误的中间件函数
错误处理的中间件和其他中间件定义类似,只是须使用4个参数以将其标识为错误处理中间件,
app.use(function(err, req, res, next) {
	console.error(err.stack);
	res.status(500).send('Something broke!');
});
3、路由级中间件
路由级中间件和应用级中间件一样,只是它绑定的对象为 express.Router();路由级使用 router.use() 或 router.METHOD() 挂载中间件。
var router = express.Router();
router.use('/testRouter/:id*', function(req, res, next){
	console.log(req.params.id);
	res.render('testJade', {name: '猛兽侠', type: "text", errors: false, books: ['A', 'B', 'C'], apples:[], book: {name: 'Javascript高级程序设计', price: 12.5}});
});
router.get('/testRouterMethod', function(req, res){
	res.send('test router.METHOD()');
});

//将路由挂载至应用
app.use('/', router);
- 按模块路由
/controller/class/controller.js:
var express = require('express');
var router = express.Router();
router.use('/class/add', function(req, res){
	res.send('add class');
});
router.use('/class/delete', function(req, res){
	res.send('delete class');
});
router.use('/class/update', function(req, res){
	res.send('update class');
});
module.exports = router;
/controller/student/controller.js:
module.exports = function(express){
	var router = express.Router();
	router.use('/student/add', function(req, res, next){
		res.send('add student');
	});
	router.use('/student/update', function(req, res, next){
		res.send('update student');
	});
	router.use('/student/delete', function(req, res, next){
		res.send('delete student');
	});
	return router;
}
var studentRouter = require('./controller/student/controller');
var classRouter = require('./controller/class/controller');
app.use('/', studentRouter(express));
app.use('/', classRouter);
五、静态资源
可以使用Express的内置中间件express.static来处理静态资源(图像、CSS文件、JS文件等)。语法如下:
express.static(root, [options])
其中:root参数指定提供静态资源的根目录。
- 示例:
在public目录下存放静态资源:
app.use(express.static('public'));
- 虚拟路径
可以使用以下方式为静态资源文件创建虚拟路径前缀(在文件系统中并不存在该路径):
app.use('/files', express.static('public'));

六、模板
1、简介
app.engine(ext, callback)
可以使用上面的方法创建自定义的模板引擎,其中:ext表示文件扩展名;callback是模板引擎函数,参数为:文件位置(filePath)、配置项(options)和回调函数(callback)。
2、自定义引擎
- 创建自定义模板引擎
ntl
使用app.engine定义模板引擎(\tpl-engine\cusTplEng.js):
module.exports = function(app){
	var fs = require('fs');
	//创建一个功能极其简单的模板引擎
	app.engine('ntl', function(filePath, options, callback){
		fs.readFile(filePath, function(err, content){
			if(err){
				return callback(new Error(err));
			}
			var rendered = content.toString().replace('#title#', '<title>' + options.title + '</title>')
					.replace('#message#', '<h1>' + options.message + '</h1>');
			return callback(null, rendered);
		});
	});
}
- 创建模板
模板(\tpl-engine\views\custom.ntl):
<!DOCTYPE HTML>
<html>
	<head>
		#title#
		<meta http-equiv="content-type" content="text/html;charset=UTF-8"/>
	</head>
	<body>
		#message#
	</body>
</html>
- 配置
//加载引擎
var tplEng = require("./tpl-engine/cusTplEng");
tplEng(app);
//指定视图所在的位置,如果值为数组,则按它们在数组中出现的顺序查找视图
app.set('views', './tpl-engine/views');
//注册模板引擎
app.set('view engine', 'ntl');
//配置路由
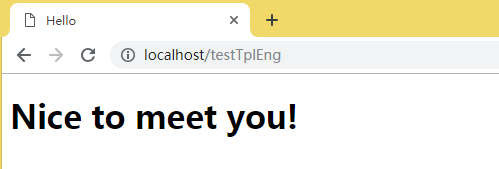
app.all('/testTplEng', function(req, res){
res.render('custom', {title: 'Hello', message: 'Nice to meet you!'});
});
- 效果
3、Jade模板引擎
- 安装Jade
npm install jade --save
- 模板
在views目录下新增模板:\views\index.jade
html
	head
		title!= title
	body
		h1!= message
- 配置
如果不指定views,则默认为:process.cwd() + '/views'目录。
app.set('view engine', 'jade');
app.get('/testTpl', function(req, res){
	res.render('index', {title: 'Hi', message: 'Hello World!'});
});
- 效果
