Spring MVC开发
一、简介
1、MVC
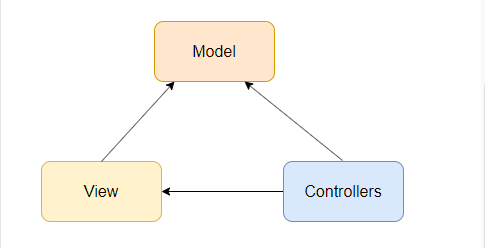
MVC(模型-视图-控制器)是一种架构模式,它将应用程序分为三个主要的逻辑组件: 模型、视图和控制器;这些组件中的每一个都是为了处理应用程序的特定开发方面而构建的。
- 模型(Model)
模型组件对应于用户使用的所有与数据相关的逻辑,它可以表示视图和控制器组件之间传输的数据,也可以表示任何其他业务逻辑相关数据。
- 视图(View)
视图组件用于应用程序的所有UI逻辑。
- 控制器(Controller)
控制器充当模型和视图组件之间的接口,处理所有业务逻辑和传入请求,使用模型组件操作数据,并与视图交互以呈现最终输出。
Java Web中的Servlet或Filter都可以充当控制器:Spring MVC和Struts1使用一个Servlet作为控制器,而Struts2则使用一个Filter作为控制器。
2、Spring MVC
Spring MVC是一个包含了Dispatcher Servlet的MVC框架,它调用控制器方法并转发到视图。
二、开发入门
1、Dispatcher Servlet
Spring MVC自带的Dispatcher Servlet的全名为:org.springframework.web.servlet.DispatcherServlet,使用该Servlet时需要在web.xml中配置:
<servlet>
	<servlet-name>SpringMvc</servlet-name>
	<servlet-class>
		org.springframework.web.servlet.DispatcherServlet
	</servlet-class>
	<load-on-startup>1</load-on-startup>
</servlet>

<servlet-mapping>
	<servlet-name>SpringMvc</servlet-name>
	<url-pattern>/</url-pattern>
</servlet-mapping>
上面配置中的on-startup是可选的,如果设置了此属性,则在应用程序启动时会装载该Serviet并调用它的init方法;否则,在该Servlet的第一个请求时加载。
该Servlet在初始化时,会在应用程序的WEB-INF目录下寻找一个命各规则如下的配置文件:
ServletName-servlet.xml
例如,按上面的Servlet配置,寻找的文件名应该是:SpringMvc-servlet.xml。也可以将此配置文件放在应用程序目录的任何地方,用Servlet的init-param元素的contextConfigLocation属性来定义:
<servlet-name>SpringMvc</servlet-name>
	<servlet-class>
		org.springframework.web.servlet.DispatcherServlet
	</servlet-class>
	<init-param>
		<param-name>contextConfigLocation</param-name>
		<param-value>/WEB-INF/config/SpringMvc-servlet.xml</param-value>
	</init-param>
	<load-on-startup>1</load-on-startup>
</servlet>
2、Controller
开发控制器可以实现org.springframework.web.servlet.mvc.Controller接口,重写handleRequest方法:
package com.study.controller;

import javax.servlet.http.HttpServletRequest;
import javax.servlet.http.HttpServletResponse;

import org.springframework.web.servlet.ModelAndView;
import org.springframework.web.servlet.mvc.Controller;

public class MyController implements Controller {

	@Override
	public ModelAndView handleRequest(HttpServletRequest paramHttpServletRequest,
			HttpServletResponse paramHttpServletResponse) throws Exception {
		return new ModelAndView("/WEB-INF/jsp/HelloWorld.jsp");
	}

}
在SpringMvc-servlet.xml中配置:
<bean name="/hello" class="com.study.controller.MyController"/>
jsp/HelloWorld.jsp:
<body>
	<h1>Hello World</h1>
</body>
访问http://localhost:8080/StudySpringMVC/hello 即可看到显示Hello World的页面。
3、View Resolver
在SpringMvc-servlet.xml中配置视图解析器:
<bean id="viewResolver" class="org.springframework.web.servlet.view.InternalResourceViewResolver">
	<property name="prefix" value="/WEB-INF/jsp/"/>
	<property name="suffix" value=".jsp"/>
</bean>
之后修改Controller中返回的视图:
public ModelAndView handleRequest(HttpServletRequest paramHttpServletRequest,
		HttpServletResponse paramHttpServletResponse) throws Exception {
	return new ModelAndView("HelloWorld");
}
三、注解
1、Controller
可以使用org.springframework.stereotype.Controller注解类型标识Spring类的实例是一个控制器;使用基于注解的控制器的优点:其一,一个控制器类可以处理多个动作;其二,请求映射不需要存储在配置文件。
Spring使用扫描机制寻找程序中所有基于注解的控制器类,因此需要在Spring MVC的配置文件中配置<component-scan/>(同时需要引入xmlns:context和对应的xsi:schemaLocation):
<?xml version="1.0" encoding="UTF-8"?>
<beans xmlns="http://www.springframework.org/schema/beans"
       xmlns:xsi="http://www.w3.org/2001/XMLSchema-instance"
       xmlns:context="http://www.springframework.org/schema/context"
       xsi:schemaLocation="http://www.springframework.org/schema/beans
       http://www.springframework.org/schema/beans/spring-beans.xsd
       http://www.springframework.org/schema/context
       http://www.springframework.org/schema/context/spring-context.xsd">

    <bean id="viewResolver" class="org.springframework.web.servlet.view.InternalResourceViewResolver">
		<property name="prefix" value="/WEB-INF/jsp/"/>
		<property name="suffix" value=".jsp"/>
	</bean>

    <context:component-scan base-package="com.study.controller"/>

</beans>
@Controller
public class AnnotatedController {

}
2、RequestMapping
可以使用org.springframework.web.bind.annotation.RequestMapping注释类型标来映射一个请求和一种方法;此注解可用于方法或类。
- value属性
@Controller
public class AnnotatedController {

	@RequestMapping(value="/hello")
	public String helloWorld(){
		return "HelloWorld";
	}
}
由于value属性是RequestMapping注释的默认属性,因此@RequestMapping(value="/hello")可以简写为@RequestMapping("/hello")。
依然访问http://localhost:8080/StudySpringMVC/hello 可看到显示Hello World的页面。
- method属性
可以通过该注解的method属性指定HTTP请求处理方法:
@RequestMapping(value="/hello", method=RequestMethod.GET)
- 注释控制器类
@Controller
@RequestMapping("/start")
public class AnnotatedController {

	@RequestMapping(value="/hello", method=RequestMethod.GET)
	public String helloWorld(){
		return "HelloWorld";
	}
}
此种情况下,所有的方法都将映射为相对于类级别的请求,此时应该访问:http://localhost:8080/StudySpringMVC/start/hello
3、请求处理方法
每个请求处理方法可以有多个不同类型的参数以及一个多种类型的返回结果;例如:请求处理方法中需要HttpSession对象和HttpServletRequest对象,则可以在方法签名上增加对应类型的参数:
@RequestMapping("/test")
public String myMethod(HttpSession session, HttpServletRequest request){
	session.setAttribute("name", "albert");
	System.out.println(request.getRequestURI());
	return "test";
}
jsp/test.jsp:
<body>
	<h1>Hi, ${name}, This is a test page. </h1>
</body>
界面显示:
Hi, albert, This is a test page.
控制台输出:
/StudySpringMVC/start/test
请求处理方法除了返回代表逻辑视图名的字符串String外,还可以返回ModelAndView、Model、Map、View、void等类型的对象。
4、使用@Autowired和@Service依赖注入
可以通过注解@Autowired注释到字段或方法上来将依赖注入到Spring MVC控制器中,除此之外,为了能被作为依赖注入,被注入的类需要用@Service注释。
@Controller
@RequestMapping("/start")
public class AnnotatedController {

	@Autowired
	private MyService myService;

	@RequestMapping("/nothing")
	public void doNothing(){
		myService.doSomething();
	}
}
另外,同@Controller一样,需要配置<component-scan/>:
<context:component-scan base-package="com.study.service"/>
jsp/start/nothing.jsp:
<body>
	<h1>NULL</h1>
</body>
访问http://localhost:8080/StudySpringMVC/start/nothing时会跳转到jsp/start/nothing.jsp页面。
5、请求参数和路径变量
- 请求参数
请求参数采用key=value形式,多个参数之间使用&分隔。
@RequestMapping("hi")
public String hi(HttpServletRequest request, @RequestParam String name, @RequestParam int age){
	request.setAttribute("name", name);
	request.setAttribute("age", age);
	return "hi";
}
jsp/hi.jsp:
<body>
	<h1>Hi, ${name}, your age is ${age}. </h1>
</body>
访问http://localhost:8080/StudySpringMVC/hi?name=albert&age=28可以看到界面显示:
Hi, albert, your age is 28.
- 路径变量
路径变量需要在@RequestMapping的路径中添加变量,该变量需要放在花括号{}之间;同时在方法签名中增加@PathVariable注解:
@RequestMapping("/hi/{name}/{age}")
public String hi(@PathVariable String name, @PathVariable int age, Model model){
	model.addAttribute("name", name);
	model.addAttribute("age", age);
	return "hi";
}
jsp页面及访问效果同上。
6、@ModelAttribute
Spring MVC在每次调用请求处理方法时,都会创建Model类型的一个实例,如果需要使用该实例,则可以在方法签名中添加一个Model类型的参数。使用@ModelAttribute注释的参数会被添加到Model对象中。
MyUser.java:
package com.study.model;

import java.io.Serializable;

public class MyUser implements Serializable{

	private static final long serialVersionUID = -7268074495125730186L;

	private String name;
	private int age;

	public String getName() {
		return name;
	}
	public void setName(String name) {
		this.name = name;
	}
	public int getAge() {
		return age;
	}
	public void setAge(int age) {
		this.age = age;
	}

	@Override
	public String toString() {
		return String.format("Name: %s, Age: %s", name, age);
	}
}
Controller:
@RequestMapping("welcome")
public String welcome(@ModelAttribute("user") MyUser user, Model model){
	System.out.println(user);
	System.out.println(model.asMap().get("user"));
	return "welcome";
}
jsp/welcome.jsp:
<body>
	<h1>Hi, ${user.name} (${user.age}), Welcome to here. </h1>
</body>
访问http://localhost:8080/StudySpringMVC/welcome?name=albert&age=28时可以看到:
Hi, albert (28), Welcome to here.
后台输出:
Name: albert, Age: 28
Name: albert, Age: 28
6、JSON
实现在请求处理方法中直接返回JSON数据,首先需要先引入以下三个Jackson的jar:
jackson-core.jar
jackson-databind.jar
jackson-annotations.jar
其次,在Spring MVC配置文件需要引入xmlns:mvc和对应的xsi:schemaLocation,并添加<mvc:annotation-driven />:
如果缺少上面两步,会出现Http 406(Not Acceptable)问题。
SpringMvc-servlet.xml
<?xml version="1.0" encoding="UTF-8"?>
<beans xmlns="http://www.springframework.org/schema/beans"
       xmlns:xsi="http://www.w3.org/2001/XMLSchema-instance"
       xmlns:mvc="http://www.springframework.org/schema/mvc"
       xmlns:context="http://www.springframework.org/schema/context"
       xsi:schemaLocation="http://www.springframework.org/schema/beans
       http://www.springframework.org/schema/beans/spring-beans.xsd
       http://www.springframework.org/schema/context
       http://www.springframework.org/schema/context/spring-context.xsd
       http://www.springframework.org/schema/mvc
       http://www.springframework.org/schema/mvc/spring-mvc.xsd ">

    <bean id="viewResolver" class="org.springframework.web.servlet.view.InternalResourceViewResolver">
		<property name="prefix" value="/WEB-INF/jsp/"/>
		<property name="suffix" value=".jsp"/>
	</bean>

    <context:component-scan base-package="com.study.controller"/>
    <context:component-scan base-package="com.study.service"/>

    <mvc:annotation-driven />
</beans>
- Controller
@RequestMapping(value = "/getUser")
public @ResponseBody MyUser getUser(){
	MyUser user = new MyUser();
	user.setAge(28);
	user.setName("albert");
	return user;
}
访问http://localhost:8080/StudySpringMVC/getUser可以看到响应类型为application/json;charset=UTF-8,响应结果为:
{"name":"albert","age":28}
7、静态资源
如果在web.xml中设置的Spring MVC处理的URL为/,表示所有的请求(包括静态资源)都会被映射到Dispatch Servlet。为了正确处理静态资源,需要在Spring MVC的配置文件中添加<resources/>元素。
如果没有引入xmlns:mvc和对应的xsi:schemaLocation则需要先添加进来,然后再设置mvc:annotation-driven和mvc:resources:
<mvc:annotation-driven/>

<mvc:resources mapping="/css/**" location="/css/"/>
<mvc:resources mapping="/images/**" location="/images/"/>
<mvc:resources mapping="/*.html" location="/"/>
<mvc:annotation-driven/>可以注册用于支持基于注解的控制器请求处理方法的bean对象;<mvc:resources/>用来指示哪些静态资源需要单独处理(不通过Dispatcher Servlet)。
四、文件上传与下载
1、文件上传
Spring MVC上传文件比较简单,只需要编写一个带有MultipartFile属性的模型类;上传到Spring MVC应用程序中的文件会被包装到该MultipartFile文件中。
- 需要增加的jar
commons-fileupload.jar
commons-io.jar
- 要Spring MVC配置文件中增加配置
其中,可以通过设置maxUploadSize来限制上传文件的大小:
<bean id="multipartResolver" class="org.springframework.web.multipart.commons.CommonsMultipartResolver">
	<property name="maxUploadSize" value="2000000"/>
</bean>
/css/main.css
form {
    margin-left:auto;
    margin-right:auto;
    max-width: 450px;
    background: #fff2cc;
    padding: 25px 15px 25px 10px;
    border:1px solid #dedede;
    font: 12px Arial;
}
h1 {
    padding: 20px;
    display: block;
    border-bottom:1px solid grey;
    margin: -20px 0px 20px 0px;
    color: mediumpurple;
}
label {
    display: block;
}
label>span {
    float: left;
    width: 20%;
    text-align: right;
    margin: 14px;
    color: mediumpurple;
    font-weight:bold;
}
input {
    border: 1px solid #dedede;
    height: 30px;
    width: 70%;
    font-size: 12px;
    border-radius: 3px;
    margin: 5px;
}
input[type="file"]{
	padding-top: 8px;
}
input[type="submit"] {
    background: #1ba1e2;
    font-weight: bold;
    border: none;
    padding: 8px 20px 8px 20px;
    color: #FFF;
    border-radius: 5px;
    cursor: pointer;
    margin-left:4px;
}
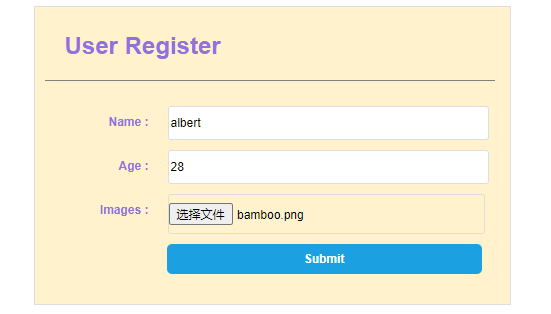
/register.jsp
<html>
<head>
<meta http-equiv="Content-Type" content="text/html; charset=ISO-8859-1">
<title>register</title>
<link rel="stylesheet" type="text/css" href="css/main.css">
</head>
<body>
<form method="post" action="register" enctype="multipart/form-data">
<h1>User Register</h1>
<label>
<span>Name :</span>
<input type="text" name="name" placeholder="Please enter a name"/>
</label>
<label>
<span>Age :</span>
<input type="number" name="age" placeholder="Please enter a age"/>
</label>
<label>
<span>Images :</span>
<input type="file" name="images" multiple="multiple"/>
</label>
<label>
<span> </span>
<input type="submit" value="Submit"/>
</label>
</form>
</body>
</html>
- Controller
@Controller
public class MyUserController {

	@RequestMapping("/register")
	public String register(HttpServletRequest request, @ModelAttribute MyUser user, Model model){
		List<MultipartFile> images = user.getImages();
		if(images != null && !images.isEmpty()){
			for(MultipartFile multipartFile : images){
				String fileName = multipartFile.getOriginalFilename();
				File imgFile = new File(request.getServletContext().getRealPath("/images"), fileName);
				try {
					multipartFile.transferTo(imgFile);
				} catch (IOException e) {
					e.printStackTrace();
				}
			}
		}
		return "information";
	}
}
上面@ModelAttribute注解未设置value属性,默认添加到model中的MyUser对象的key为myUser,可以在显示结果页面information.jsp中获取该值。
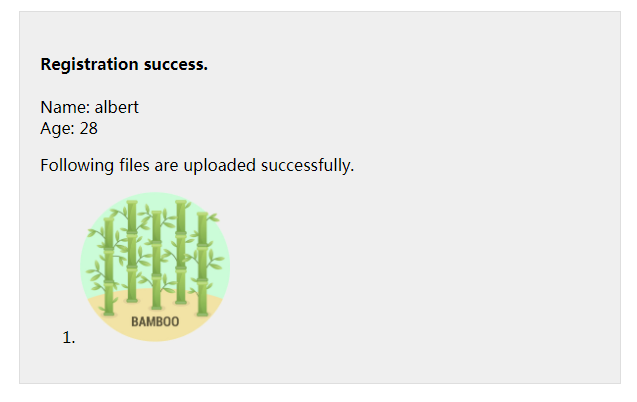
/WEB-INF/jsp/information.jsp
此处只是为了演示,因此在显示图片时未使用遍历,应该使用forEach标签来处理。
<html>
	<head>
		<meta http-equiv="Content-Type" content="text/html; charset=ISO-8859-1">
		<title>User Information</title>
		<style>
			#info {
			    text-align: left;
			    border: 1px solid #dedede;
			    background: #efefef;
			    width: 560px;
			    padding: 20px;
			    margin: 100px auto;
			}
		</style>
	</head>
	<body>
		<div id="info">
		    <h4>Registration success.</h4>
		    <p>
		        Name: ${myUser.name}<br/>
		        Age: ${myUser.age}<br/>
		    </p>
	        <p>Following files are uploaded successfully.</p>
	        <ol>
	            <li>
	            	<img width="150" src="images/${myUser.images[0].originalFilename}"/>
	            </li>
	        </ol>
		</div>
	</body>
</html>
2、文件下载
样例:/WEB-INF/data目录下存放着一些文件,需要得到授权的用户才能下载。
/WEB-INF/data/confidential.vip
- Controller
package com.study.controller;

import java.io.BufferedInputStream;
import java.io.File;
import java.io.FileInputStream;
import java.io.IOException;
import java.io.OutputStream;

import javax.servlet.http.HttpServletRequest;
import javax.servlet.http.HttpServletResponse;
import javax.servlet.http.HttpSession;

import org.springframework.stereotype.Controller;
import org.springframework.ui.Model;
import org.springframework.web.bind.annotation.RequestMapping;
import org.springframework.web.bind.annotation.RequestParam;

@Controller
public class ResourceController {

	@RequestMapping("/login")
	public String login(@RequestParam String username, @RequestParam String password,
			HttpSession session, Model model){
		if("admin".equals(username) && "albert".equals(password)){
			session.setAttribute("loggedIn", Boolean.TRUE);
			return "resources";
		}else{
			model.addAttribute("tip", "Sorry, you don't have permission.");
			return "tip";
		}
	}

	@RequestMapping("/download")
	public String download(@RequestParam String filename, HttpSession session,
			HttpServletRequest request, HttpServletResponse response, Model model){
		if(session == null || session.getAttribute("loggedIn") == null){
			model.addAttribute("tip", "You need to login first.");
			return "tip";
		}
		String dir = request.getServletContext().getRealPath("/WEB-INF/data");
		File file = new File(dir, filename);
		if(file.exists()){
			response.setContentType("text/plain");
			response.addHeader("Content-Disposition", "attachment; filename=" + filename);
			byte[] buffer = new byte[1024];
			BufferedInputStream bis = null;
			try{
				bis = new BufferedInputStream(new FileInputStream(file));
				OutputStream os = response.getOutputStream();
				int i = bis.read(buffer);
				while(i != -1){
					os.write(buffer, 0, i);
					i = bis.read(buffer);
				}
			}catch(IOException e){
				e.printStackTrace();
			}finally{
				if(bis != null){
					try {
						bis.close();
					} catch (IOException e) {
						e.printStackTrace();
					}
				}
			}
			return null;
		}else{
			model.addAttribute("tip", "Sorry, the file does not exist.");
			return "tip";
		}
	}
}
/WEB-INF/jsp/tip.jsp
显示提示信息页面:
<html>
	<head>
		<meta http-equiv="Content-Type" content="text/html; charset=ISO-8859-1">
		<title>Tip</title>
	</head>
	<body>
		<h3>${tip}</h3>
	</body>
</html>
/WEB-INF/jsp/resources.jsp
资源列表页面:
<html>
	<head>
		<meta http-equiv="Content-Type" content="text/html; charset=ISO-8859-1">
		<title>resources list</title>
	</head>
	<body>
		<ul>
			<li><a href='download?filename=confidential.vip'>Download confidential file</a></li>
		</ul>
	</body>
</html>
- 运行
访问http://localhost:8080/StudySpringMVC/login?username=admin&password=albert登录成功后,点击页面上的Download confidential file链接即可下载文件。
附:文件上传与下载例子中对应的Spring MVC的完整配置:
<?xml version="1.0" encoding="UTF-8"?>
<beans xmlns="http://www.springframework.org/schema/beans"
       xmlns:xsi="http://www.w3.org/2001/XMLSchema-instance"
       xmlns:mvc="http://www.springframework.org/schema/mvc"
       xmlns:context="http://www.springframework.org/schema/context"
       xsi:schemaLocation="http://www.springframework.org/schema/beans
       http://www.springframework.org/schema/beans/spring-beans.xsd
       http://www.springframework.org/schema/context
       http://www.springframework.org/schema/context/spring-context.xsd
       http://www.springframework.org/schema/mvc
       http://www.springframework.org/schema/mvc/spring-mvc.xsd ">

    <bean id="viewResolver" class="org.springframework.web.servlet.view.InternalResourceViewResolver">
		<property name="prefix" value="/WEB-INF/jsp/"/>
		<property name="suffix" value=".jsp"/>
	</bean>

    <bean id="multipartResolver" class="org.springframework.web.multipart.commons.CommonsMultipartResolver">
    	<property name="maxUploadSize" value="2000000"/>
    </bean>

    <context:component-scan base-package="com.study.controller"/>
    <context:component-scan base-package="com.study.service"/>

    <mvc:annotation-driven />

    <mvc:resources mapping="/css/**" location="/css/"/>
	<mvc:resources mapping="/images/**" location="/images/"/>
	<mvc:resources mapping="/*.html" location="/"/>
</beans>